Thursday, August 27, 2009

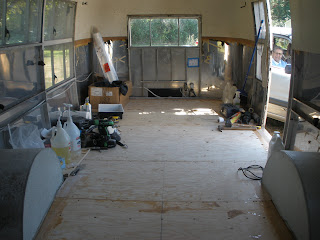
Island Girl has a new subfloor


Pam is peeking from her spot in her car.  She did come inside to check it out, but quickly retreated to the familiar seat in the car.

Still have quite a bit to do on the subfloor:  add the rest of the bolts and screws, bolt down the C channel, add some cloth and epoxy, and rivet in the rear steel plate.  I'm really pleased, though, to have this big step mostly done.  Island Girl is actually looking something like a trailer again.


Tuesday, August 25, 2009

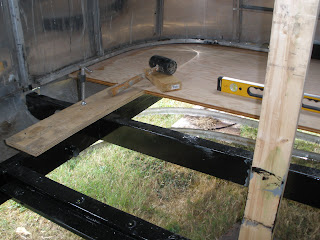
Subfloor goes in slowly but surely

One more piece of the subfloor to go in.  Wheel wells are back in as well.  It takes me two days for each piece of floor:  one to cut out, epoxy the lower side, and do the fiberglass layup over the edge, and then day two to get it into the trailer with doublers as needed and some of the fasteners in.


I've been using 3/4" ply doublers where I have seams that don't meet at structure. They are all epoxy coated and the mating surfaces have cotton flox mixed in the epoxy to get a better bond.


Using self tapping screws where I've replaced crossmembers with 2x4 tubing, but I'm tapping those holes first. Elevator bolts are being used when I'm attaching to crossmembers.


Even though I haven't yet fastened any of the C channel to the subfloor, the trailer is much stiffer than it was before.  That vertical 2x4 on the floor jack has helped a lot on getting the new plywood in.  It lifts up the rear of the shell easily and makes the floor sections pop in with no problem at all.

Two more days and I'll have my subfloor in and there's still no rain in the forecast.


Friday, August 14, 2009

The subfloor starts to go in


I got the last two windows back in, just in with no operators, but in.  Got to keep the wet stuff out if the subfloor is going back in.  Short of time today and I really wanted to put that aft piece of subfloor in.  I wanted to see how hard it would be to get in there.  I knew I'd regret it if I tried today--just knew I'd have troubles and be sorry I tried.  Couldn't wait, though.

Used the same technique that I used to support the shell while painting the frame with POR-15.  Got out a 2x4 with a radiused "T" on top, jacked it up vertically with a floor jack with the "T" on a rib line, and raised the rear part of the shell up.  Lifted it enough to have about 1 1/2" of clearance between the C channel and the outriggers.  Slid the new plywood in one side, spread the shell at the bottom a bit, and that rear section popped right in.  Fit is really good.

Hopefully tomorrow I'll get the doubler made from plywood for this first seam.  I'm having to fit a little to get clear spans of subfloor over my tanks as there's no room for doublers on top of them and most of the crossmembers have moved in those areas, so they don't line up at the seams.  I'm planning to install a couple of rear sheets and a couple in front and finish the subfloor install around my axle.

My goal since I started Island Girl's renovation in February has been to get the subfloor back in before our Pacific Northwest weather changes back into rain.  I know I'll make that goal now and that's a really good thing for me.  With a floor in, I can get heat in the trailer and keep working through the cold months ahead.

New goal for the fall and winter is new insulation, new wiring, and getting the upper interior skins installed.

Wednesday, August 12, 2009

The Start of a New Subfloor


I was planning to drive to Deming on Monday to see the trailers at the rally up there since I had respite care for Pam that day.  My buddy Darrell offered to make a plywood run that day too and since my little car is hopeless for plywood hauling, we picked up 6 sheets of 3/4" ACX and a couple of sheets of 1/8" Baltic Birch so I can see how it finishes out for later.

I'd made cardboard templates of the front and rear panels before ripping out the old subfloor, so I transferred the rear template to a sheet of plywood, added in the C channel width, and subtracted 1/4" of wiggle room, and cut it out.  Went with ACX instead of marine ply since I knew I woud be coating it with epoxy on both sides.  I used a router to bullnose the edge on both sides and layed up a 6" piece of fiberglass cloth around that edge, using Rutan BID cloth sourced from Aircraft Spruce and System Three epoxy.  That particular cloth I've used before and it goes around corners, like that plywood edge, really well.

I can't think of a better way to seal that vulnerable plywood edge.  I'm sure it's overkill since I'm 57 and my trailer is 52--I know what I'm doing will outlast me.  Maybe she'll still be around when she is 100, though, and wouldn't that be cool?


Tuesday, August 4, 2009

Painting the Frame with POR 15

Today was one of the days that I get a few hours away from Alzheimers when Charlene comes and watches Pam for 6 hours. That made today the day to paint the frame with POR 15.

I've been spending the last several days getting the frame ready for the paint. Some grinding, quite a bit of wire brushing, cleaning with Marine Clean and etching with Metal Ready got me to yesterday when I got it masked off. My trailer shell has been supported lately by the steel plate riveted in front and several strips of 3/4" ply placed under the C channel and on top of the outriggers, held by C clamps. Those strips really needed to come out for the paint, but the shell still needed some support.


Decided to try supporting it with a couple of 2x4's with a short piece of 2x4 on top in a T and cut to follow the radius of the inside top of the shell. I lifted the shell using the 2x4's and a couple of floor jacks. Just raised the shell enough to unload the 3/4" plywood strips. Don't want to leave it very long this way, but it gave me access to all the outriggers for paint today and the strips can go back in tomorrow.

Like many have said, POR 15 is just amazing stuff. Flows really well, sets up fast. I got two coats on all of the frame, including the bumper and the tongue. Did one coat in grey and one in black so I could see where I'd been. Ran out of time for the Sterling Silver, so it'll get done tomorrow. Seems like most guys have been less happy with it and the way it goes on, so I'll see tomorrow.


I'm actually thinking about putting the subfloor back in now--that's exciting stuff.


Sorry for the poor pics, the photographer was tired.